WebSocket (in)Security and Authentication
WebSocket security aspects and a simple PoC about adding a ticket-based authentication layer in a WebSocket server.

The trust of the innocent is the liar’s most useful tool. - Stephen King
Before proceeding
This blog post is an extract translated from my “WebSocket (In)Security and Authentication” articles (written in Italian) available at https://blog.rev3rse.it/websocket-insecurity-1 and https://blog.rev3rse.it/websocket-insecurity-2 where WebSocket security is discussed at a more generic level. The complete code of the PoC can be found at https://github.com/tsumarios/Hardened-WebSocket-Server.
Real-time Web applications are increasingly widespread nowadays, especially for the need to manage data flows constantly and gradually updated. Just think, for instance, of the countless signals from the sensors in the field of the Internet of Things (IoT). Traditionally, the approach to develop Web applications that require real-time communication between client and server has requested excessive abuse of the HTTP protocol, as it was necessary to carry out continuous polling of the server to receive updates and, on the other hand, send data flows through different HTTP calls. This naturally involved not indifferent problems that led to the affirmation of a more effective and appropriate solution: the WebSocket protocol. A myriad of Web applications uses this protocol to view live data, chat in real-time, handle state updates, et cetera.
WebSocket Protocol
The WebSocket protocol, defined in RFC 6455, provides full-duplex communication channels between a client and a server on a single TCP connection. The protocol consists of an opening handshake - initialised via an HTTP Upgrade request - followed by frames of basic messages, stratified over TCP. The goal of the protocol is to provide a mechanism for browser-based applications that need bidirectional communication with servers, avoiding the opening of multiple HTTP connections. This technique is useful and can be adopted for a variety of applications in the Web field, including multiplayer games, modification of shared documents, instant messaging, analysis and/or real-time viewing of data, push notifications, and so on. In short, the protocol works as follows: once the client and the server sent both their handshake messages and the procedure was successful, the data transfer part begins. This translates into a two-way communication channel where each of the parties can, independently of the other, send data at will. After the handshake, clients and servers transfer data via the conceptual units specified by the standard as “messages”. On the physical level, a message consists of one or more frames. The WebSocket protocol represents one of the most suitable solutions to overcome the problems illustrated in the introduction: not by chance its implementations are commonly used in modern Web applications.

WebSocket connections are generally long-lasting as they normally remain open and inactive until the client or server is ready to send a message. Assuming that a WebSocket server is configured correctly and awaiting incoming connections, a WebSocket client can normally use the Javascript client-side code to start a connection to the server. At the end of the handshake, the network connection remains open and can be used to send WebSocket messages in both directions, until one of the parties sends a closing frame (or disconnect), in an asynchronous way. According to the standard, WebSocket messages can contain UTF-8 strings or binary data and, in this regard, in modern applications, it is very common for the JSON format to be used to send structured data - or BSON (Binary JSON) when serialization is involved data -, inside WebSocket messages.
WebSocket Security
Generally, the use of the WebSocket protocol may expose an application to different risks. Indeed, the standard does not consider some security implications by design, therefore it is necessary to take some measures to avoid unwanted incidents. In theory, any type of Web vulnerability that can be present with HTTP could also arise in relation to the WebSocket protocol. Before seeing an overview of the main attacks and measures to be adopted, it is useful to observe that different headers expected in the Handshake WS, despite the somewhat misleading names, do not actually serve in terms of safety:
- The Connection and Upgrade headers in the request and in the answer indicate that it is a WebSocket Handshake;
- The Origin request header is used to protect against unauthorized cross-origin use of a WS server script that uses WebSocket APIs in a Web browser;
- The Sec-Websocket-Version request header specifies the version of the WebSocket protocol that the client wishes to use;
- The Sec-Websocket-Key request header contains a random value, with base64 encoding, which should be randomly generated for each handshake request;
- The Sec-Websocket-Accept response header contains a hash of the value sent via the Sec-Websocket-Key request header, concatenated with a Globally Unique Identifier (GUID) specified by the protocol as follows: “258aFa5-E914-47da-95CA-C5DC85B11”. This string will be - thus justifies the RFC - “hardly used by endpoints that do not include the WebSocket protocol” and therefore it serves to add integrity to the protocol itself.
As for the three Sec-WebSocket-* headers, the “Sec-“ prefix must not therefore deceive: it is part of the so-called forbidden HTTP request header names, together with the “Proxy-“ prefix and a list of reserved names. These prefixes and names are chosen to prevent the headers from being set or changed arbitrarily - for example through JavaScript code -, thus preventing malicious sites from sending the metadata user agent modified together with the request and, therefore, offering greater safety to websites with respect to the content and value of these request headers.
Validation and Sanitisation
First of all, it is extremely important to treat the data from both client and server as untrusted, therefore it is essential to validate and sanitise the inputs from the client (and the server outputs): the server may be exposed to Input Data Attacks, such as SQL INJECTION, XML External Entity Injection et similia; the client may instead be exposed to Cross-Site Scripting (XSS) attacks. In this regard, it is not recommended to assign the content of the messages from the server directly to the DOM or, worse, treat it as a code ready to execute. In the case of JSON messages, remember that it is always a good idea to use the JSON.parse() method in combination with the exception handling and, if necessary, appropriate sanitisation methods also on the client side.
DoS and Tunneling
The protocol allows an unlimited number of connections to reach the server, making the latter vulnerable to denial of service (DoS, DDoS) attacks. It is therefore recommended to adopt a rate limiting mechanism, in order to check the rate of requests received as well as limit Web scraping. In addition, the arbitrary tunnelling over WS of a TCP service, such as FTP or VNC, is to be avoided. The most common use case consists in carrying out tunnelling to bypass the restrictions of firewalls. However, in addition to not being the most appropriate way to solve the problem, this process would expose the system to further risks: in the case of XSS, for instance, those services would be exposed as the arbitrary code that will be performed can communicate to them directly.
WebSocket Secure (WSS)
Since the exchange of data is in plain text, these are vulnerable to Man-in-the-Middle (MitM) attacks that could involve the tampering of messages, namely delete or manipulate or modify the latter, and obviously dataleaks. Similarly to HTTP, it is therefore recommended to add a level of encryption using the TLS protocol: this way the WSS (WebSocket Secure) protocol can be used instead of the regular WS, ensuring the encryption of communication and data integrity.
WS Authentication and Authorisation
It is good to specify that the adoption of the WSS protocol does not imply a method of authentication. The latter, together with authorisation, is not intrinsically considered in the standard: the server is not allowed to authenticate the client during the handshake process. Contrary to what one might think, the Sec-WebSocket-Key header - as we have seen above - contains a random value to prevent memorisation errors in the cache of the proxy and is not used for purposes of authentication or session management - it is therefore NOT a CSRF token. So, how can we solve this lack of authentication then? The answer might seem trivial, but it is necessary to dig a little more deeply. So far we have observed that the issues that we could meet when dealing with the WebSocket protocol are the same as we could come across the Web field in general. The solution to the authentication problem could therefore be the use of the normal authentication mechanisms used for HTTP: authentication via HTTP Basic Authentication, via cookies, via TLS. In this second part of the article we will better analyse this aspect and will realise that it is necessary to adopt a different solution if we want to focus on a more general implementation - and at the same time as much safer - that works fine with browsers as clients.
In any case, if we wanted to rely on HTTP cookies for the management of the session, we would find ourselves in front of Cross-Site WebSocket Hijacking (CSWSH) vulnerability, that is a Cross-Site-Request-Forgey (CSRF) on the WS handshake message. An attacker could therefore create a malicious Web page on his domain that establishes a WebSocket connection between the sites to the vulnerable application, which will manage the connection in the context of the victim’s user session. In this regard, it is therefore good to protect the message of Handshake WebSocket against CSRF, precisely to avoid CSWSH vulnerability. Furthermore, it is important to avoid relying on the Origin header as a test of authentication as it is substantially informative and can be easily manipulated by an adversary. However, the Origin header is useful as a measure against CSWSH in combination with a CSRF token.
In many real-world use cases, we can expect that WebSocket servers need to authenticate clients. However, RFC 6455 - remember that the WS protocol is defined by this standard - does not provide a specific solution to the authentication problem, which it only dedicates the following lines to:
This protocol doesn’t prescribe any particular way that servers can authenticate clients during the WebSocket handshake. The WebSocket server can use any client authentication mechanism available to a generic HTTP server, such as cookies, HTTP authentication, or TLS authentication.
In fact, none of these options works well in practice, especially if you want to implement a general solution where you can also use the browser as a WS client. The developers of the Python websockets module provide some very useful practical examples on each of the methods below, but many of them are not usable on different implementations. In a more general perspective, indeed, the use of cookies becomes an uncomfortable compromise for the reasons that we will see shortly, HTTP authentication is not supported by all browsers and TLS authentication in a browser would result in a bad experience for the user, as well as causing privacy issues.
Cookies
In a Web application, cookies can be used to identify the user’s session. However, in the event that the WS server runs on a different domain than the Web application’s, we would meet Same-Origin policies: for security reasons, it is impossible to set a cookie on a different origin. There would be solutions to this problem, using a hidden iframe - but it would be required to act on the management of cookies on the server side and it is not necessarily supported natively by the library we use -, or by sharing a “parent” domain between the HTTP server and the server WebSocket and setting the cookie on the primary domain, but this would cause the cookie to be shared with all subdomains, which is unacceptable.
Query Parameters in WS URI
Certainly a reliable method. It involves authentication before the WS handshake - although done at the application and not the protocol level - but it exposes you to a usually unacceptable risk: URIs end up in logs, which means potential credential leaks. This could be partially avoided with the use of disposable tokens, but parameter parsing should be performed on the server side and not all protocol implementations could support it (except after the handshake has taken place).
HTTP Basic Auth
If we want to focus on the best solution, while giving up the possibility of using the browser as a WS client, then we have an effective answer without any doubt: HTTP authentication. This would also be a good idea for browsers in theory, but in practice, this mechanism doesn’t work due to poor support: only Chrome and Firefox seem to have compatibility, although Firefox presents some caching issues.
Custom HTTP Header
The most elegant solution ever, which would solve most problems. However, guess what, the WebSocket API does not support the ability to set custom headers.
TLS Client Auth
In TLS authentication, the client (browser) uses a certificate to authenticate itself during the TLS handshake. There are several problems with using a certificate that has prevented its adoption on the Web: user experience, privacy issues, and portability. In summary, this mechanism would be too complex and inconvenient for the average user.
The first message is what matters
Sending credentials in the first message represents the most reliable and simplest method ever for authenticating a WebSocket client, applicable regardless of the implementation we use. This can be done thanks to a ticket-based mechanism - in the next section we will see all the details. However, it should be noted that authentication is thus managed by the application - and not at the protocol level as it is a good idea to follow - and is in any case carried out after the handshake, therefore once the connection is established. However, these two “negative sides” represent the lesser evil, if our goal remains simplicity and the possibility of disconnecting ourselves from a specific implementation of the protocol, compared to the methods we have listed above, which would instead require more tailor-made solutions.
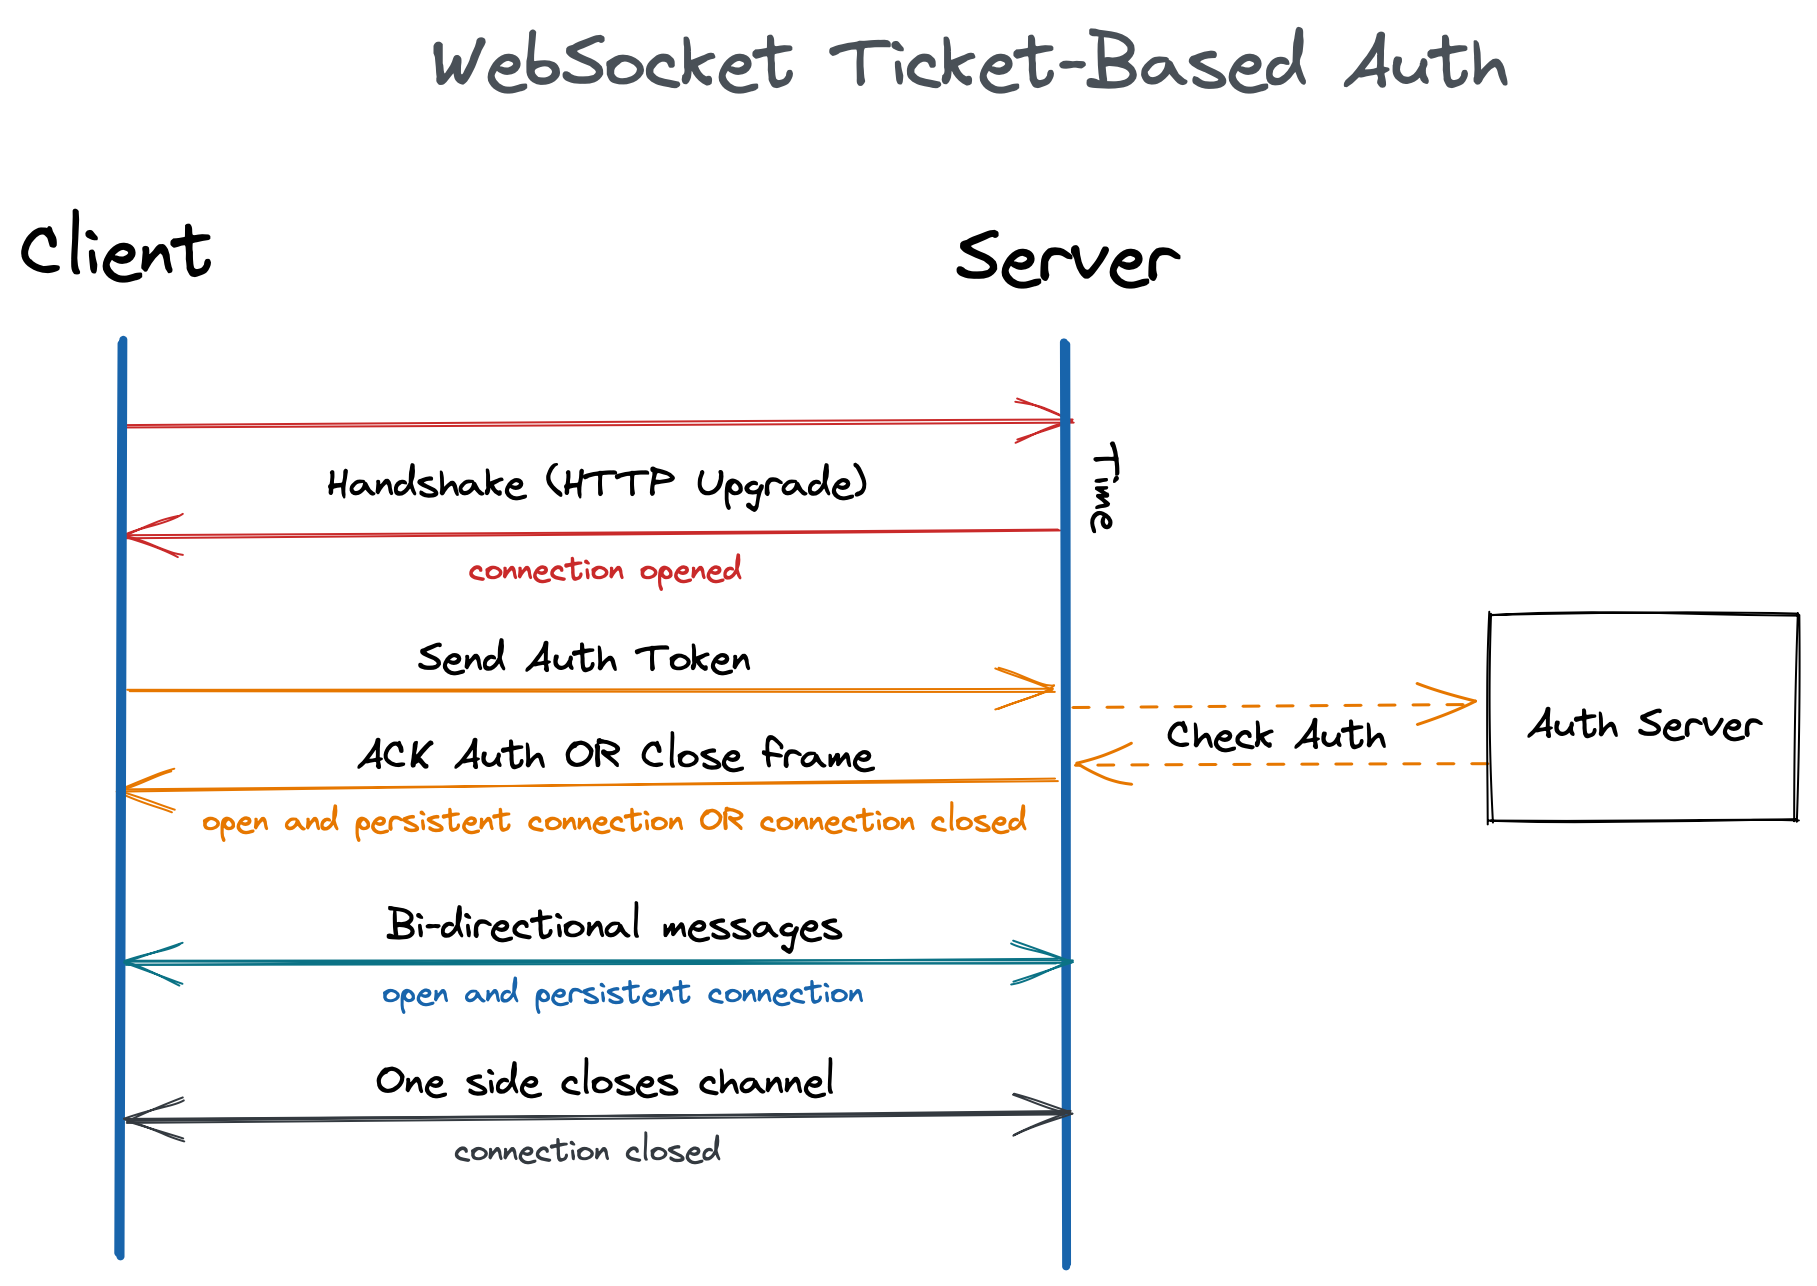
WebSocket Server Auth Hardening
At this point, having clearer the theory, let’s finally move on to the practical part in which we are going to implement an authentication mechanism in a simple WebSocket server according to the last option, that is, sending the authentication test as the first message of the connection. The diagram below summarises the complete authentication flow, including the part - for simplicity simulated and not implemented - in which the client requests the authentication token from the server - this in general will be different from the WS server - which takes care of it before forwarding it as the first message to the WebSocket server:
For this demo, the code we will analyse was written in Python and, for the implementation of the WebSocket server, a module that implements the protocol in a simple and intuitive way was used: SimpleWebSocketServer. The frontend part consists of a simple HTML file with the addition of JavaScript code for handling the WebSocket connection to the server.
WS Server
For simplicity, let’s start by implementing the SimpleEchoServer class, by extending the WebSocket class from the SimpleWebSocketServer module, which represents an echo server that returns any message - the expected format is JSON in this case - sent by the client and prints basic logging information:
class SimpleEchoHandler(WebSocket):

    def handleMessage(self):
        data = json.loads(self.data)
        logging.info('> Received msg from %s: %s' % (self.address[0],  data))
        self.sendMessage(json.dumps(data))

    def handleConnected(self):
        logging.info('> Client connected %s' % self.address[0])

    def handleClose(self):
        logging.info('> Client disconnected %s' % self.address[0])
To add the authentication mechanism - and with it, you also have to manage the authorisation behind the scenes - it is sufficient to add a boolean attribute to the class, in our case authenticated, which will hold the status of the client’s authentication and, subsequently, implement a decorator thanks to which we can extrapolate the token from the message and perform the authentication check, that in our case is done by invoking the simulate_auth_server_check function. If the check is successful, then you return to the normal execution of the message handling method. Otherwise, the server sends a close frame and the connection will be closed. If the client is already authenticated, this check is skipped and the normal execution of the method will proceed. Here is the implementation of the decorator:
def login_required(func):
    def wrapper_login_required(self, *args, **kwargs):
        if not self.authenticated:  # Not (yet) authenticated
            token = json.loads(self.data).get('token', '')
            self.authenticated = simulate_auth_server_check(token)  # Check if token is valid
            if not self.authenticated:
                logging.info('> Client unauthenticated %s' % self.address[0])
                self.close(1011, u'unauthenticated')
            else:
                logging.info('> Client authenticated %s' % self.address[0])
                self.sendMessage('Successfully authenticated.')
        else:   # Regular handling if already authenticated
            func(self, *args, **kwargs)
    return wrapper_login_required
Our SimpleEchoServer will then ultimately look like this:
class SimpleEchoHandler(WebSocket):

    def __init__(self, server, sock, address):
        super().__init__(server, sock, address)
        self.authenticated = False

    @login_required
    def handleMessage(self):
        data = json.loads(self.data)
        logging.info('> Received msg from %s: %s' % (self.address[0], data))
        self.sendMessage(json.dumps(data))

    def handleConnected(self):
        logging.info('> Client connected %s' % self.address[0])

    def handleClose(self):
        logging.info('> Client disconnected %s' % self.address[0])
The check part of the authentication token will, for convenience, be simulated by a very trivial function. In a real scenario you would probably have a call to the server dedicated to this kind of control, but for this PoC we can settle for something like this:
def simulate_auth_server_check(token):
    # Simulate a check request to the auth server
    return token == 'ebfb7ff0-b2f6-41c8-bef3-4fba17be410c'
To conclude the backend implementation, the main will take care of launching our beautiful WS server along with a classic Web server - this will be useful for providing the Web pages which the browser can connect from via WebSocket connection - that will listen on a new thread:
def main():
    # ...Arguments parsing here...

    (options, args) = parser.parse_args()

    if options.ssl == 1:
        ws_server = SimpleSSLWebSocketServer(options.host, options.port, SimpleEchoHandler, options.cert, options.key, version=options.ver)
        httpd = HTTPServer(('', 443), SimpleHTTPRequestHandler)
        httpd.socket = ssl.wrap_socket(httpd.socket, server_side=True, certfile='./cert.pem', keyfile='./key.pem', ssl_version=options.ver)
    else:
        ws_server = SimpleWebSocketServer(options.host, options.port, SimpleEchoHandler)
        httpd = HTTPServer(('', 80), SimpleHTTPRequestHandler)

    # Graceful shutdown handling
    def close_sig_handler(signal, frame):
        ws_server.close()
        if options.ssl == 1:
            httpd.shutdown()
            http_server_t.join()
        sys.exit()

    signal.signal(signal.SIGINT, close_sig_handler)

    # Start the HTTP(S) server in a thread
    http_server_t = Thread(target=httpd.serve_forever, daemon=True)
    http_server_t.start()
    # Start the WebSocket server
    ws_server.serveforever()
In case we have a certificate and a TLS key, everything is configured to run the WebSocket server using the WSS protocol and, of course, the HTTP server will use HTTPS - just run the script passing the options and files as arguments.
WS Client
The client side comes with JavaScript code added in an HTML file to manage the connection, messages and any errors in a fairly simple way, as well as sending the famous authentication token as the first message. The page consists of a text box that serves as an input for the token, one for sending and another for receiving messages and, finally, the classic buttons for connecting, disconnecting and sending messages. When the Connect button is clicked, a WS connection is created to the address the WS server is listening to and the authentication token is sent as the first message. If authentication is successful, the connection remains open and it is possible to test the echo server which will come back with whatever message we send. Below is the code:
<body>
    <input type="text" name="token" id="token" value="ebfb7ff0-b2f6-41c8-bef3-4fba17be410c">
    <input type="button" value="Connect" onClick="connect();">
    <input type="button" value="Disconnect" onClick="disconnect();">
    <input type="text" name="text" id="message" placeholder="Add a message here">
    <input type="button" value="Send" onClick="sendMessage();">
    <div name="output" id="output" cols="30" rows="1"></div>
</body>
<script>

    /* Button clicks handling */

    const connect = () => {
        token = document.getElementById('token').value;   // Assume the client retrieved its token from the auth server

        // Create a WebSocket instance and register main events
        ws_client = new WebSocket('ws://localhost:5678/');
        ws_client.onopen = (event) => { onOpen(event); };
        ws_client.onmessage = (event) => { onMessage(event); };
        ws_client.onclose = (event) => { onClose(event); };
        ws_client.onerror = (event) => { onError(event); };
    };

    const sendMessage = () => {
        let message = document.getElementById('message').value;
        ws_client.send(JSON.stringify({ 'msg': message }));
    }

    const disconnect = () => { ws_client.close(); }

    /* WebSocket main events handling */

    const onOpen = (event) => { ws_client.send(JSON.stringify({ token })); };
    const onMessage = (event) => {
        console.log(event.data);
        document.getElementById('output').textContent = event.data;
    };
    const onClose = (event) => {
        console.log('Connection closed.', event.reason);
        document.getElementById('output').textContent = `Disconnected. ${event.reason}`;
    };
    const onError = (event) => {
        ws_client.close();
        document.getElementById('output').textContent = `Error. ${event.reason}`;
    };

</script>
Demo
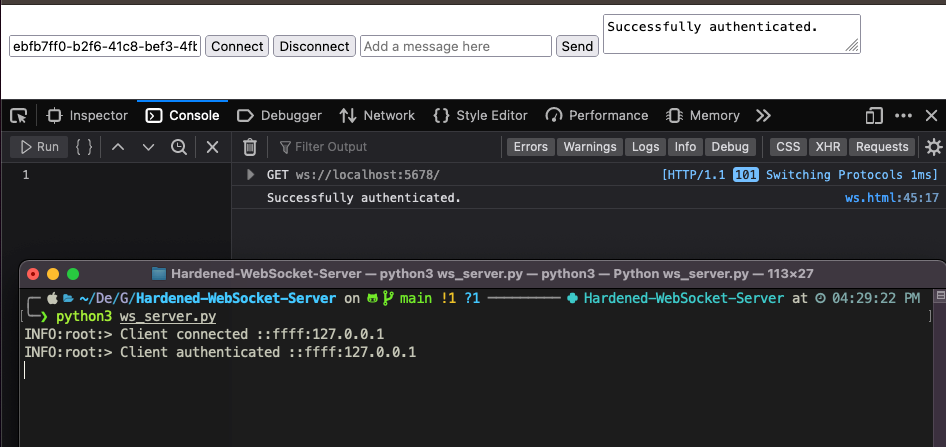
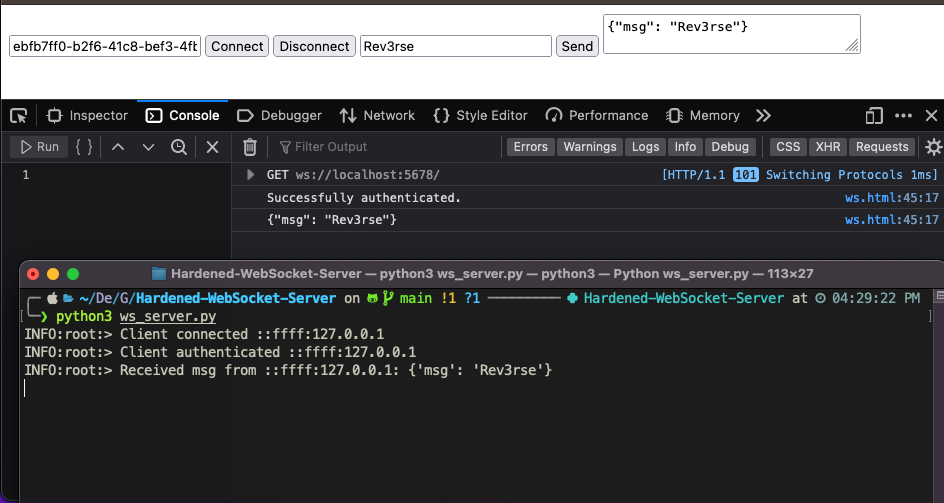
To execute the code, simply launch the Python script and from a browser go to the address on which the Web server is listening. At this point it is possible to observe - the server will print log messages - that upon clicking the Connect button the client sends its token as the first message immediately after the handshake and the server, having authenticated it, does not terminate the connection:
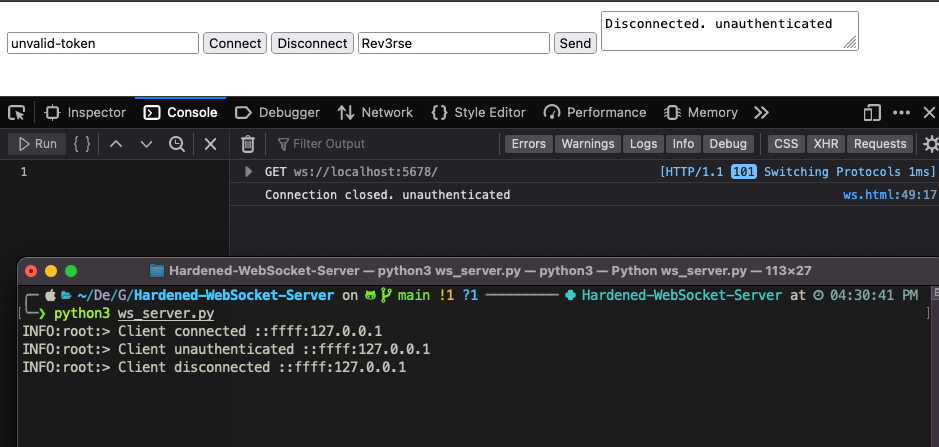
If we try to send a different token instead, thus simulating an invalid authentication test, the server will immediately close the connection:
Conclusions
The WebSocket protocol is certainly the best solution for developing real-time Web applications. In this article, we have presented the main characteristics of the protocol and we have analysed the main security problems which, as illustrated, can be substantially configured in the classic Web vulnerabilities. We have then discussed the authentication problems in the WS protocol and after reporting the main solutions, each with its pros and cons, we focused on the ticket-based authentication mechanism. This is the most generic and applicable method regardless of the protocol implementation and, at the same time, one of the safest. Finally, we presented a simple proof-of-concept on how to implement a hardened version of a WebSocket server, adding a ticket-based authentication level, which might hopefully represent a starting point for real use cases and scenarios.
References
- https://github.com/tsumarios/Hardened-WebSocket-Server
- https://blog.rev3rse.it/websocket-insecurity-1/ (Italian article)
- https://blog.rev3rse.it/websocket-insecurity-2/ (Italian article)
- https://datatracker.ietf.org/doc/html/rfc6455#section-10
- https://openaccess.inaf.it/handle/20.500.12386/31533
- https://www.neuralegion.com/blog/websocket-security-top-vulnerabilities/
- https://websockets.readthedocs.io/en/stable/topics/authentication.html
- https://portswigger.net/web-security/websockets
If you want to support me, I would be grateful ❤️
You may also enjoy
-
How to Set Up WireGuard without Getting Headaches
Jul 28, 2024 • 5 min read
-
How TOTP Works
Oct 7, 2022 • 8 min read